Here’s a preview of their presentation:
Tips for Easier Gardening
Select tools that are best for you:
Techniques
0 Comments
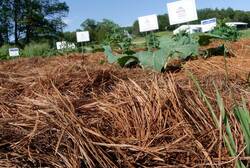 We often get questions about using pine needles, also known as pine straw in either compost or used as mulch. Same questions for oak leaves. Many believe that using pine straw or oak leaves will acidify the soil and not be suitable for many plants. This year a large donation of pine straw was provided to the Spooner Agricultural Research Station Teaching and Display Garden. Master Gardeners immediately put it to good use as a mulch. Below is an article contributed by Kevin Schoessow, UW Extension Area Agriculture Development Educator, Spooner Agricultural Research Station providing information on this question. Pine needles, like other leaves, are perfectly fine to add to your compost pile. Keep in mind that pine needles, like other leaves or straw, are high in carbon and are considered “brown” materials and should be mixed in a ratio of approximately 3 to 1 with “greens” like grass clipping or food scraps which are higher nitrogen materials.
Fresh pine needles--because of their waxy coating--take a long time to break down and should be limited to no more than 10 percent of the total brown material added to a compost pile. Shredding pine needles and other materials added to the compost will increase the surface area of these materials and speed up decomposition. While fresh pine needles, or oak leaves for that matter, have a pH ranging between 3.2-3.8, they do very little to impact the pH of finished compost. The reason is that as needles and leaves break down, they are neutralized by the microbes that are doing the decomposing work. Most finished compost has a pH of 6.8-7.0 which is very neutral. Another potential benefit of pine needles in the compost pile is that they help maintain good aeration. They do not compact readily and keep air flowing through the pile, which is also important in speeding up the composting process. The notion that pine needles change compost or soil pH is basically a myth. Even if freshly fallen pine needles that have been added to compost are mixed into soil, they will only have a slight impact on pH and over time this impact will be diminished by decomposing microbes. Part of the reason this myth continues is because people associate pine trees with acid soil and that it is hard to grown anything under a pine tree. Everyone assumes that the accumulated pine needles are making the soil so acidic that nothing will grow. The reason nothing will grow is because the roots of evergreens are so numerous and shallow that they outcompete other plants for water and nutrients. They also tend to create quite dense shade which is a difficult growing situation for many plants. So if you are blessed with an abundance of fallen pine needles, rest assured that they are perfectly fine to add to compost--although in limited amounts. Fallen pine needles, sometimes referred to as pine straw, is also a suitable mulch for flower beds, under trees and around shrubs and even in the garden. Remember that the little acid that might be found in pine straw and other leaf materials will be neutralized by microbes and will have negligible effects on soil pH.  The Internet is a great way to get current information on almost any topic, but how do you sort through all the information and find a reliable source? Here are a few tips to limit your searches that will do the sorting for you. This example gives you the results using the various methods in Google for “green bean rust”. Typing in green bean rust into a search engine resulted in about 1,120,000,000 results! I did this same experiment in 2012 with 8.5 million results, which is an indication of how much the Internet has exploded in just a decade. In trying to narrow it down – here are the results:
The Master Gardener program highly recommends obtaining your information from reliable sources. Preferred sources include academic institutions, government agencies, botanical gardens, and non-profit organizations. Tip from the Master Gardener Program
While it is better to use a preferred source for information, other sources often come up first when looking things up online. Don’t stop there! Use this as the first step in the process of finding information and searching for more preferred sources. You may learn terms or concepts that you can then apply in a new search with keywords that also use the word “university” or “.edu” to help bring up university sources of information.
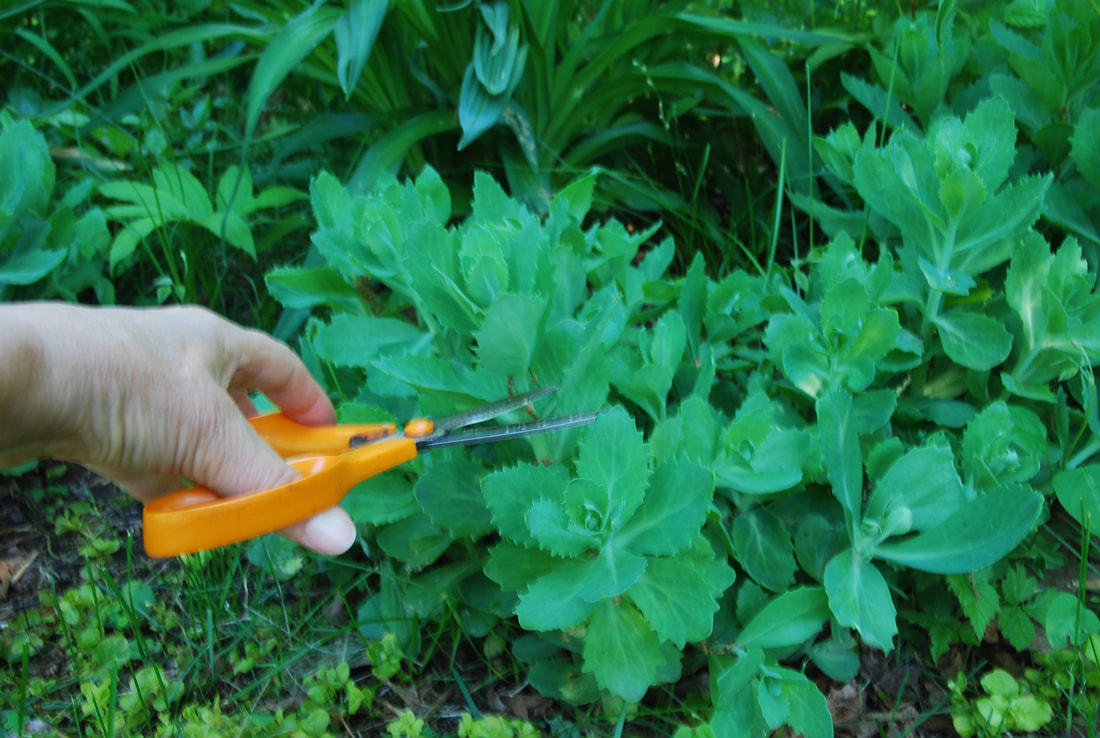
Techniques
Deadheading is the removal of old or spent flowers and is beneficial to most herbaceous ornamentals. Seed production can drain a plant’s energy and cause foliage to deteriorate. Deadheading can promote vegetative and root growth rather than seed production. By deadheading you can prolong bloom periods, initiate a second smaller bloom, improve overall appearance, and prevent self-seeding. Some examples of species that benefit from deadheading are: Daylilies, Hostas, Lady’s Mantle, and Lambs Ear. Cutting back refers to pruning a plant to renew its appearance or encourage a new flush of growth or flowering, control its height or flowering time. Pinching can accomplish the same objective. If you travel for several weeks, you can cut certain plants by one third to delay bloom time until you get back home. Examples: Dianthus, Candy Tuft, Moss Phlox, Catmint, Geranium Amsonia, Baptisia, Achillea, Aster, Mums, Sedum, Joe Pye Weed. Pinching allows for experimentation and usually involves removing only the growing tips. Generally do this early in the growing season because it will delay bloom time. Examples: Sedum, Shasta daisy, Joe Pye Weed, Aster, Artemisia. Thinning can prevent disease, create sturdier stems, and increase the size of flowers. It can often help to increase air circulation to help prevent powdery mildew. Use this on: Aster, Delphinium, Mondarda, Phlox, Bulgeweed, Lambs Ear, and Lady’s Mantle. Disbudding involves removing side buds so that the plant’s terminal bud produces larger flowers on a longer stem. Removing the terminal bud will cause the side buds to produce smaller but more flowers; it can also eliminate the need for staking. Examples: Mums, Carnations, Pinks, Dahlias, Peonies. Deadleafing removes individual dead leaves to improve appearance. Examples: Elijah Blue grass in spring, Lady’s Mantle in summer, and Hellebores (Lenten Rose) in the spring. A great source of information on all these techniques is The Well-Tended Perennial Garden by Tracy DiSabato-Aust, Timber Press, 2006. Article and photo credit: Sue Reinardy, Master Gardener
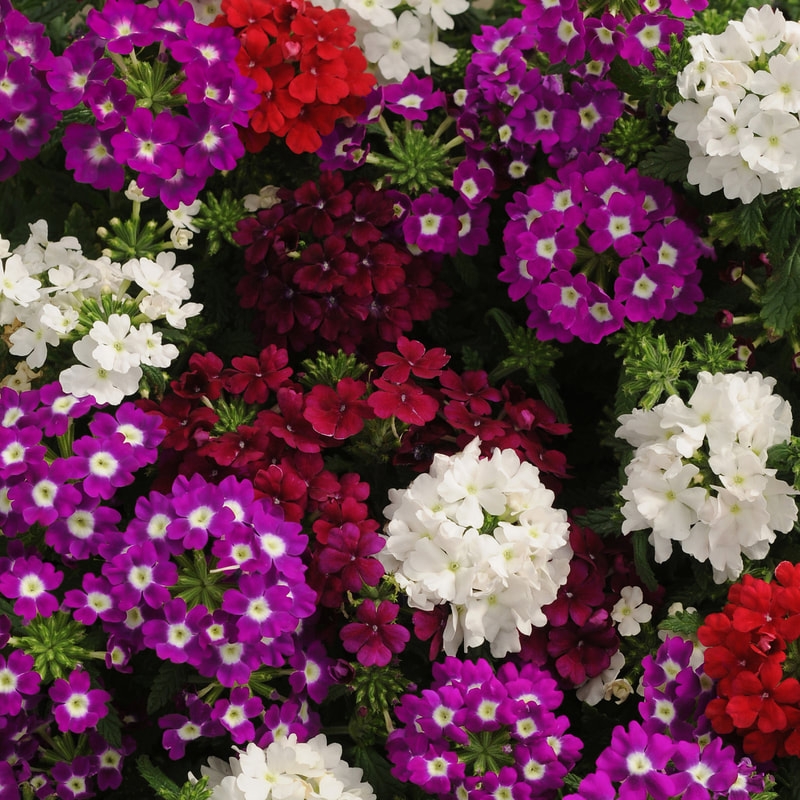
Pollinators love verbena! Hummingbirds, butterflies, and moths are all frequent visitors. Bees of all types love verbena, too. Known for withstanding the pressure of hot, dry conditions, Verbena is a member of the Verbenaceae family, which is comprised of 800 species in 32 genera, many of them native to the Americas and Asia. This family is characterized by clumps or spikes of flowers on heat-loving herbs, shrubs, trees, or vines. There are many varied types and habits, including upright and tall, as well as mounded and trailing. Some verbena make great ground covers as well.
Hybrid varieties generally have larger flowers, brighter and more saturated colors, and larger, more weather-tolerant leaves than their species relatives. bred to be more heat, water-stress, and disease tolerant (especially powdery mildew). Leaves and foliage are often dense and, in many species, “hairy.” Its flowers are small with five petals, arranged in dense clusters. Typical colors include shades of blue and purple, but they can also be found in white and pink shades. Others are bred to withstand heat and humidity with flowers and bulky growth non-stop through the growing season. While verbena seed is available, many of the newer varieties that have the desirable traits are vegetatively propagated and can be found as young plants at your local garden retailer in the spring. Verbena looks their best when their soil is kept moist, but not wet as they do not like soggy feet. If the growing medium dries down too much, it can cause flushing, commonly known as cycling-out-of-color where the plant loses blooms but remains green and leafy. Verbena plants should be placed in sunny locations, aiming for 6+ hours of direct light. Most species perform well in the ground, landscape, hanging baskets and patio containers. For the compact-growing verbena, those work best in pots and do not have the root vigor for garden bed applications. For prolonged flowering, deadhead verbena by removing spent flower heads. Powdery Mildew (PM) is an unfortunate occurrence on some verbena. The best practice is to look for newer varieties that have a built-in resistance. If PM does appear (it will present as white patches of fluffy fungus on leaves or stem) treat with a neem spray or your favorite fungicide. Catching PM early is the best solution, as this disease can spread quickly, and its fungus blocks sunlight to the plant’s nutrition system, making the plant unable to produce food, which will ultimately cause the plant to perish. Gardening with verbenas can elevate your landscape design and add texture and color to your patio containers. You’ll appreciate their colorful branches and how well they play with other flowers in your garden. Credit to https://ngb.org/year-of-the-verbena/ Contributed by: Vicki Gee-Treft, Master Gardener Volunteer 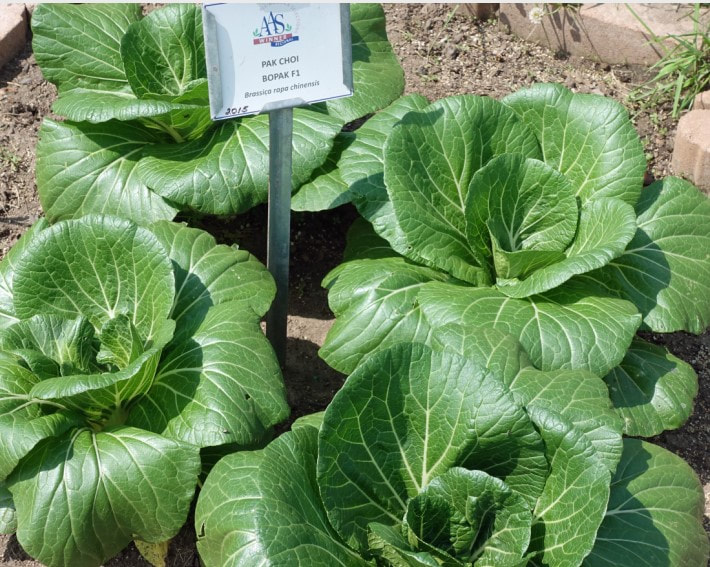 Growing GREENS, which can be served raw, wilted, blanched, sautéed, or grilled.
The Asteraceae family has some of the best-known salad greens:
Most greens prefer full sun and cool weather (50 to 75°F). Soil that’s evenly moist, but not too wet, yields the best greens. As a general guide, spinach, kale, and mustard greens can be sown six weeks before the last frost, followed by lettuce and chard three weeks later. You can choose to transplant seedlings to get a jump on the season or sow seeds directly into the garden or containers. To ensure a continuous harvest, reseed as often as every few weeks depending on the variety. Note, store seed in the fridge in an airtight container to extend longevity. To prepare outdoor soil, consider mixing in 1 cup of organic fertilizer for every 10’ row. For containers, choose one that is large enough that it won’t easily dry out. Fill with quality potting mix and consider mixing in peat and coir (coconut fiber). Planting depth varies by variety, so be sure to read seed package instructions. After germination, thin seedlings to desired spacing. If your goal is baby leaf, keep the spacing fairly dense. If you’d like to harvest whole heads, ensure spacing of 4”-8” apart within a row. For baby leaf, you can start harvesting when leaves are 3-4” tall. Many varieties will tolerate “cut-and-come-again” harvests. Allow full-size heads 3-5 weeks after transplant to mature. Once leaves reach maturity, harvest right away to encourage new growth and another harvest in just a few weeks. Leafy greens will have different flavors at different stages of harvest. Experiment to find out which flavor works best for you! As much as possible, monitor for over-exposure to heat and water to avoid “stressed greens” that taste bitter rather than fresh. When plants bolt (or send up flower stalks), pull them up as the quality will start to diminish after this. In our colder region, hardier greens like kale, mustard and spinach extend our season, and row cover protection can help achieve an earlier first harvest in the spring and a later final harvest in the fall. Use your fresh salad greens in unexpected ways. Red Butterhead makes a fabulous and healthy burger wrap. Grilled Romaine? A tasty twist on an old favorite. Wilted spinach? It’s incredible. Massaged kale? Pair bitter greens with a sweet dressing and your favorite soft cheese for a gourmet flavor combination. Sturdier greens like romaine, kale, and chicory hold up well when mixed with grains, nuts, and thick dressings. Choose a theme and create a new and interesting salad mix every time. Try it and you’ll be hooked! Credit to https://ngb.org/year-of-the-salad-greens/ Contributed by: Vicki Gee-Treft 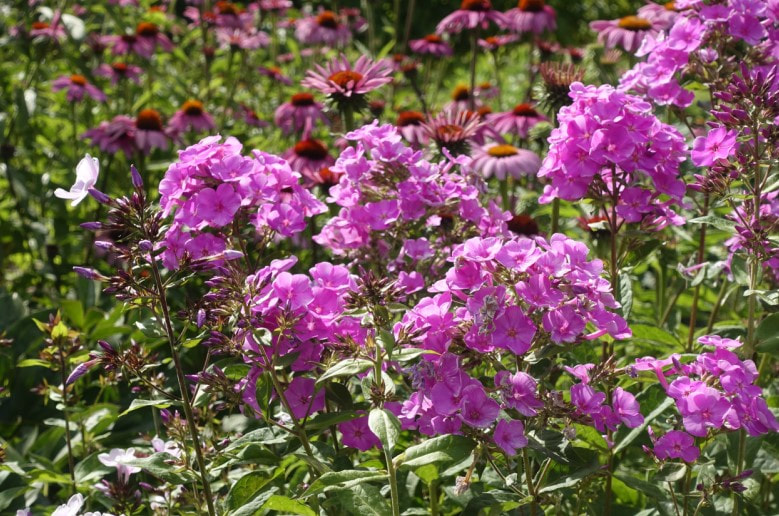 Popular with pollinators, Phlox is a wide-ranging North American native perennial and a common fixture in woodland, prairie, and meadow landscapes from Florida and Quebec to Alaska. Phlox is a genus with a multitude of species, heights, bloom times, and garden applications. A tubular flower with five petals is common with colors between white, pink, magenta, purple, and blue across the genus, as well as some species showing notable orange or red coloration. Through all of the diversity, Phlox can be loosely grouped into two types: spring bloomers and summer bloomers.
Spring Bloomers Phlox subulata (Creeping Phlox, Moss Pinks) and other early-spring blooming species are low-growing, ground-hugging plants. Typically native to rocky, well-drained environments, when put in a garden without restriction, they become carpets of color, tending to spread as ground covers. Summer Bloomers Most first think of Tall Garden Phlox, a clump-forming perennial that blooms in midsummer and is among the tallest of this species with perfectly formed large, rounded flower panicles that top each stem. Newer summer-blooming varieties tend to bloom a bit earlier, rebloom after the first flowers when trimmed back, have a more mounded shape and a stoloniferous habit. Gardening Tips:
Credit to https://ngb.org/year-of-the-phlox/ Contributed by: Vicki Gee-Treft 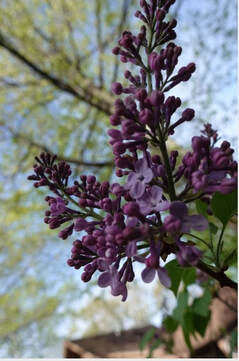 Enjoy the fragrance and beauty that lilacs bring in spring. Today with about 30 different species, varieties have been developed for heat tolerance, reblooming flowers, compact size and even growing happily in a container on a balcony.
Clusters of small, four-lobed flowers are developed into cone-shaped to narrow pyramid clusters (panicles, i.e., branched inflorescence) that stand out from the green heart-shaped leaves. These flowers can be single or double in every imaginable shade of lilac and purple to hues of red, pink, blue, yellow, cream and white—even picotee (white-edged, deep purple ‘Sensation’). Its color may also change from bud to bloom as the flower matures. Lilacs grow best in full sun, with good drainage and fertile, slightly alkaline soil. Begin with testing soil drainage by digging a hole 8 inches across and 12 inches deep and filling it with water. If any water remains in the hole after an hour, choose another planting area. After following the planting directions on the tree’s label, water lilacs regularly for the first couple of years—at least 1” of water a week. Ongoing maintenance: Cut off spent flower-heads within a month after bloom to help set more flowers for next year. Cut off root suckers to keep the common lilac from spreading into a colony. Prune out any dead or broken branches from storm or winter damage. Pruning annually is not necessary, but to rejuvenate an overgrown plant or one that blooms sparsely, cut 1/3 of the oldest branches back to 12-15” from the ground. Do this over a 3-year period to refresh the plant without sacrificing blooms. Powdery mildew can be unsightly but generally does not harm the plant. You can make a spray of 2 tablespoons of baking soda in a gallon of water with a couple of drops of Ivory liquid. Spray it on the leaves, but not if the temperature is over 80°. The alkalinity of the solution helps to kill the fungus. Early Spring maintenance: Apply granular organic fertilizer at the base of the plant and water it in well. Buds are set the previous year, so the fertilizer feeds this year’s leaves and next year’s blooms. Fall maintenance: If your soil is very acidic, add garden lime. Rake fallen leaves from around the plant, and if you had powdery mildew or any disease, bag leaves and toss in the garbage. Did you know, the stems of the common lilac have a spongy pith that can be removed, leaving hollow tubes that were used to make pan-pipes? In 1753, Carl Linnaeus first described the lilac genus, Syringa, from the ancient Greek word syrinx, meaning pipe or tube. Credit to https://ngb.org/year-of-the-lilac/ Contributed by: Vicki Gee-Treft, Master Gardener Volunteer 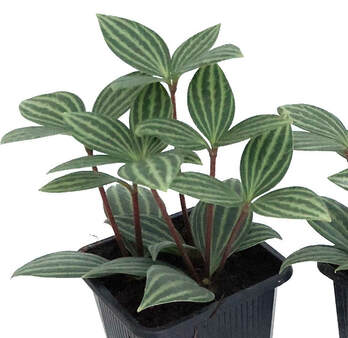 Since the 1930s, Peperomia has been sold as houseplants, largely due to their lower-light needs, smaller size, and succulent tendency. Grown for its amazing foliage, peperomia can range from bushy to trailing, upright or cascading, with a variety of colors (red, green, grey, cream or variegated) and leaf shapes (thick, plump, smooth, rippled or shiny). With this plant, one can create eye-catching arrangements for small home spaces. Peperomia puteolata photo credit: National Garden Bureau The care of peperomias depends on the species or cultivar chosen. All of them are a bit succulent, so watch the watering routine closely, putting your finger in the soil to monitor the top 50% of the soil and not wanting it too wet. Liking tighter spaces, it can be planted in a snug pot with a fast-draining potting medium, adding perlite and/or orchid bark for best results. Also, clay pots work well as water escapes through the porous pot sides. Generally, plants with thick, fleshy leaf variegation will stay brighter in a higher light situation. (See website below for descriptions of popular varieties.)
Within the Piperaceae family that provides the pepper spice in our foods, Peperomia, however, is not for human or pet consumption. Credit to https://ngb.org/year-of-the-peperomia/ Blog written by: Vicki Gee-Treft, Master Gardener Volunteer
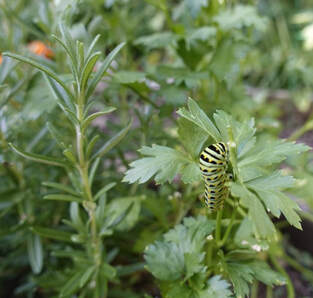
Thyme (Thymus vulgaris) Very versatile herb has many uses in cooking. Hardy perennial (zone 5), great for containers, rock walls, or garden. Thyme needs full sun in light sandy well drained soil, do not over-water or fertilize. Doesn't do well when competing with weeds. Flowers in summer, pollinated by bees. Rosemary (Rosmarinus officinalis) Classic herb used in many meat and vegetable dishes. Very tender perennial grown as an annual in our region, I have tried to bring this plant in several years however is did not survive. It can be difficult to bring indoors. Great plant for containers or garden, full sun and well-drained soil, drought tolerant and will flop over if watered too much. Giant of Italy Parsley (Petroselinum crispum)This variety produces a bushy plant and a continuous supply of flat leaves with strong parsley flavor. This plant is hardy for Zone 5 to 9. This is grown as an annual in our area. It can grow in pots or garden; in full sun and rich, well-drained soil, water adequately (especially if in container), host plant for swallowtail butterfly caterpillars. Genovese Basil (Ocimun basilicum) A classic annual, large leaves are very aromatic. Very tender, needs to be covered when night time temps dip below 50. Annual ~ fragrant plant growing 18-24”. Plant outdoors after any danger of frost and soil temp is 70⁰, plant in full sun in light well-drained soil, great plant for containers or in the garden, when plant starts to flower pinch back to extend growing season. Garlic Chives (Allium tuberosum) Tends to look like an onion but has the mild taste of garlic. Pick the flattened leaves for cooking. White star shaped flower clusters are a pleasant surprise in late August. Very hardy perennial ~ in zones 4-8, reseeds readily, plant in full sun to part shade in well-drained soil, keep moist, great plant for containers (can be slightly invasive), cut back in fall and bring container indoors, keep cool & dry until spring, then put in a window, water and watch for new growth. Bouquet Dill (Anethum graveolens) A prolific producer of edible flowers, leaves and seeds, all which can be used for flavoring everything from pickles, potatoes, and fish. Hardy annual, readily self seeds, fragrant plant growing 6”, bolts in very hot dry weather so water adequately in droughts (early morning), drought tolerant, needs shade from sun, and can tolerate part shade. Preferred plant to swallowtail butterfly caterpillars. Contributed by: Jill Schmalz-Washkuhn, Master Gardener Volunteer
|
|
| North Country MGV | gARDEN bLOGS |

 RSS Feed
Location |
|