|
Part 2 of Seed Starting Indoors Like many gardeners, I am thinking about next year's garden even before the snow flies. My mind is on spring seed starting in the fall as I am putting the gardens to bed. When all is done and my potting shed organized, I pull out my seed starting trays and containers. My potting shed will be snow bound in the dead of winter so bringing my supplies up to the garage in the fall saves getting the snow shoes out and launching an expedition. Getting ready in late winter works well too and can be a great "cabin fever" activity. Seed packets, starter mix and containers will have started appearing in the stores in late January and February. Seeds will sometimes be discounted this time of year as well. Whether you buy new or reuse your equipment year after year, it is recommended to sanitize your containers before starting. You can wash them in hot soapy water and rinse well or just submerge them in a tub of water with 10% bleach for a few minutes. In the fall, I like to pre-fill my containers with a mixture of potting soil and starter mix and arrange them in the trays. I then store the trays stacked one on top of the other in a large plastic bag in the cold garage away from exhaust so I'm ready to go in the spring. Because soilless starter is great for getting seeds started but not ideal for growing seedling, mixing starter with potting soil is, for me, the best of both worlds. My containers are six-pack plant containers left over from seedling I buy at the garden center. I arrange them in plastic mesh trays set into leak proof trays (flats from the garden store). When I'm getting ready to sow my seeds, I will bring the trays in from the garage and let them warm to room temperature (65-75 degrees is ideal). Then I saturate the soil well by filling the tray with about a 3/4 inch of water and let the containers soak up the water from the bottom for 15 or 20 minutes then lift out the mesh tray of containers, and dump any excess water. 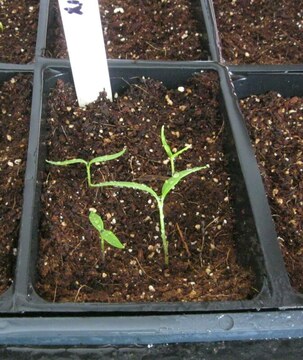 The first leaves are called cotyledons. Notice the moist and drying soil by color difference. Photo by Pam Davies Keeping the soil moist is essential for starting seeds and nurturing seedling. The soil should be visibly wet but not sodden. Stick your finger in to feel the moisture. As it dries out note the change in color of the soil. I use a spritzer to keep the soil moist, spritzing twice a day or more. Until the seedlings emerge you can cover them with a plastic lid to keep the moisture in but be careful of fungus developing. Once the seedlings have emerged, uncover and use a small fan on low for at least part of the day to keep the air moving. This will help prevent fungus and encourage strong stems but it will also dry out the soil so it is necessary to keep tabs on your trays to spritz as needed or re-saturate the soil from below if it seems to be drying out too much to keep up with the spritzer alone. If I have fresh seeds I will try to sow six seeds per container as I am fairly certain I will get near 100% germination. If I sow more seeds I will thin out the excess seedlings by pinching them off or snipping with a small scissor. This is actually quite painful for me. I really hate to kill off little plants. If I am being soft-hearted, I will prepare a six-pack container with moist potting soil, make six indentations with my finger then carefully dig out the excess seedlings with a small spoon and transplant them to the new container (see video link below). If you must touch the seedling, gently grasp them by the leaves as the stems are very tender at this early stage. Label, label, label!! Too often I have labeled only one container in a flat for each type of plant. I know that the one next to it is the same so why waste time labeling them all. Later I will get confused about which unmarked container belongs with which label. If I have more then one variety of tomatoes, for instance, this is a real problem as I won't know which one is which. So now I label everything. I will use these labels in the garden anyway so there really is no wasted effort. Once your seedlings have several sets of true leaves (more than just the first two cotyledon leaves), you can start thinking about fertilizing. A weak (1/4 strength) all purpose, water soluble fertilizer applied once a week will do just fine. Over fertilizing can kill the young seedling so less is better. My seedlings will remain in the six-pack containers until they are about 5 to 6 inches tall, then I will transplant them (pot up) into 4 inch pots, one seedling per pot. Depending on when you start your seedlings, you may not need to pot up but can plant them directly into the garden from the six-pack container when the sun warmed soil is ready and there is no chance of frost. As my grandmother used to say, "there is more than one way to skin a cat." Sounds a little gruesome but the point is there is no single right way to start seeds indoors. Some folks like soilless starter mix, or a potting soil, peat and perlite mix or just plain potting soil. You might prefer peat pots or starter plugs or making their own paper pots to plastic containers. All there methods work so experiment to find out what you like and what works for you. Do Google searches on "seed starter vs potting soil," "peat pots vs plastic," "potting up seedlings" for a variety of article and videos. Potting up video Potting up broccoli video Watch for Seed Starting Indoors part 3 where I will talk about hardening off seedlings and planting them in the garden. Article by Pam Davies, MG volunteer
1 Comment
Patricia Tjader
3/22/2022 10:41:07 am
Appreciate Your input for gardening. Leave a Reply. |
|
| North Country MGV | gARDEN bLOGS |
 RSS Feed
Location |
|