• Home
  • Teaching Gardens
    • Twilight Garden Tour >
      • 2020 Virtual Twilight Garden Tour
  • Archives
    • Members >
      • Meetings
      • Committees
      • Member Handbook
      • Presentation Resources for Members
      • Volunteer Opportunities
      • Continuing Education
      • Onboarding
    • Press Releases
    • Plant Sale
    • Kids in the Garden
    • 2021 Handouts
    • 2020 Handouts
    • 2019 Event Handouts
    • 2018 Handouts
    • 2017 Handouts & Slides
    • 2016 Handouts & Slides
    • Archive Photos Pinwheels
  • About/Contacts
    • Speakers Available
  • Helpful Links
  • Training
  • Blog
    • Videos
  North Country MGV

gARDEN bLOGS

Common Mistakes Experienced in Seed Starting

3/28/2022

0 Comments

 
Picture
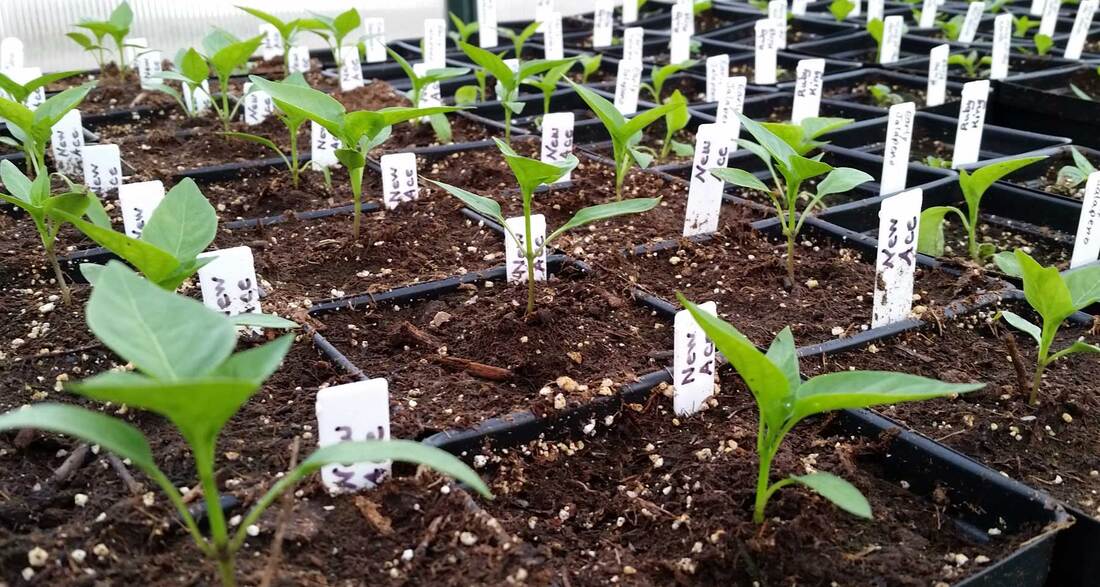
Seed starting indoors can be a great way to satisfy that craving to get out into your garden before Mother Nature cooperates, however, there are some rules of thumb to follow to keep that thumb green. Read on to discover seven common mistakes on starting seeds indoors, based on great insight from Kerry Michaels as well as our own Pam Davies:   

  1. No window view: Unfortunately, windows are typically not the best place for young seedlings as they can be drafty, the glass conducts cold, and nighttime temperatures can drop fast. Even that south-facing window likely is not a great option.
  2. Let the Light Shine: In addition to consistent temperature, seedlings do best with consistent light. A cool, white fluorescent double-bulb hanging fixture suspended 2-3 inches above the seedling trays for 12 to 16 hours per day is ideal. One option is to purchase large fluorescent shop lights outfitted with one warm bulb and one cool bulb. Suspend the lights from chains so that you can raise the lights higher as the seedlings grow. Keep the lights as close to the seedlings as possible without touching them (2 to 3 inches). When seedlings first appear, keep the lights turned on for 12 to 16 hours per day.
  3. Applying Too Much or Too Little Water: The amount of water you use is one of the biggest factors in the success of seedling growth. It is key to keep the sterile seed-starting medium damp but not wet. To increase your chances of success, you can create a mini-greenhouse to keep soil moist: cover the container with plastic until the seeds germinate. Also, water from the bottom to enable the seedlings to soak up water through the container drainage holes. Add water slowly for 10 to 30 minutes, and use your finger to touch the top of the soil to ensure that moisture has reached the top of the container. Be sure to check soil moisture at least once a day. There are also self-watering systems available. 
  4. Keep it Cool, but Not Too Cool: Most seeds must be kept warm -- about 65 to 75 degrees Fahrenheit -- to germinate. One favorite option is to place the seedlings on top of the refrigerator. Another option is seed-warming mats that are placed under the seed trays.
  5. Too Much Too Soon! Be careful not to expose the seedlings to too much sun and wind when you take them outdoors for the first time. The sun in late May can be tricky as temps may still be cool but the sun is powerful and can burn even the hardiest of plants. Begin hardening in a sheltered spot in shade then dappled sun for a few hours the first few days, increasing exposure until the plants are reveling in their new environment. Also, there is no need to fertilize during the hardening off phase, but watering is a must!
  6. Take the Temperature! Before planting in the garden, be sure that soil temps are warm enough to encourage root growth and to avoid shock. The warmer the better is a good rule of thumb. Your beds should be fully warmed and the soil turned to a depth of at least 8 - 12 inches, depending on what you are growing. In plant hardiness zones 3b-4b, our average last frost is May 24-30. Keep in mind when choosing seeds, especially when sowing directly into the garden bed, that our growing season here in Northwest Wisconsin is roughly 100 days. Hardy plants such as broccoli, Brussels sprouts, kohlrabi, cabbage, onions, leeks and parsley can take ground temps as cold as 40 degrees but if they have been started indoors and are not used to those temps you might want to wait until the ground warms a bit more. You can sow these seeds directly into the ground at these soil temps. Tender plants will need soil temps of at least 50 to 65 degrees. Basil, tomatoes and peppers, need the warmer soil temps. Squash, pumpkins, and sweet corn can take the cooler, while cucumber and muskmelon like the middle range.
  7. Giving Up Too Soon! Starting seeds can be difficult, but it is a process filled with lessons learned that will only improve your efforts in the future. Growing plants from seeds takes dedication, attention and time, but can be extremely worthwhile.


Additional resources:
https://extension.umn.edu/planting-and-growing-guides/starting-seeds-indoors#hardening-off-seedlings-1179860

Author:  Kimberly Kayler
0 Comments

Spring:  Start of Seed Starting

3/21/2022

1 Comment

 
Picture
Although the days may be getting longer and we often see hints of spring this time of year – usually followed by another cold blast – we all know that planting season is coming. To this end, you may be considering starting your seeds indoors, which is a great option. Seed packets, starter mix and containers will have started appearing in the stores in late January and February. Seeds will sometimes be discounted this time of year as well.  However, there are many rules of thumb to follow related to starting seeds indoors. Read on for some great tips by Kerry Michaels as well as our own Pam Davies:  
  1. Don’t Get Over-Zealous! Since most plants are ready to go outside four to six weeks after you start the seeds, it is key not to start too early!
  2. Spring Cleaning! Whether you buy new or reuse your equipment, it is key to sanitize your containers before starting. Wash them in hot soapy water and rinse well or just submerge them in a tub of water with 10% bleach for a few minutes. You may even consider pre-filling your containers in the fall with a mixture of potting soil and starter mix and arrange them in the trays. 
  3. They Are Finicky! Know your seeds as they can be finicky when it comes to how deep they are planted. Some seeds need complete darkness to germinate while others require light. Proper planting depth is usually provided on the seed packet. A general rule of thumb is to plant seeds two to three times as deep as they are wide.
  4. Don’t Sow too Many!  If you are new to sowing seeds indoors, start off slow. If you sow more seeds than you can reasonably maintain, it will become challenging to nurture the seedlings into adulthood. Depending on the type of plant you want to grow, you might be able to direct-sow seeds in outdoor containers or in the ground when outdoor temperatures warm up. It also is a good idea to label your containers.
  5. Watch Your Water Levels! Keeping the soil moist is essential for starting seeds and to nurture seedlings. However, though the soil should be visibly wet, it should not be sodden. As it dries out note the change in color of the soil. A spritzer also can be used to keep the soil moist, spritzing twice a day or more. A small fan can be used if needed to keep air moving and prevent fungus. Once your seedlings have several sets of true leaves (more than just the first two cotyledon leaves), you can start thinking about fertilizing. A weak (1/4 strength) all purpose, water soluble fertilizer applied once a week will do just fine. Over fertilizing can kill the young seedling so less is better.  

Now comes the “hard” part. When the seedlings are large enough to plant outdoors, you need to prepare them for the transition by hardening off. Hardening off involves exposing your plants to the elements gradually, preparing the seedlings for outdoor conditions like wind, rain and sun. To begin, place your seedlings outdoors for one hour, and then bring them back indoors. Gradually increase the amount of outdoor time every day for 6 to 10 days. You will need to make some judgment calls based on the outdoor temperature and the fragility of your seedlings. If it is a particularly cool day or very rainy, you will want to decrease the time of that hardening-off session.
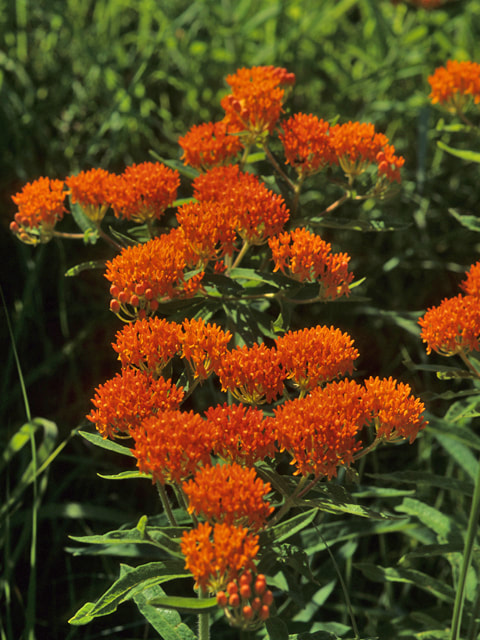
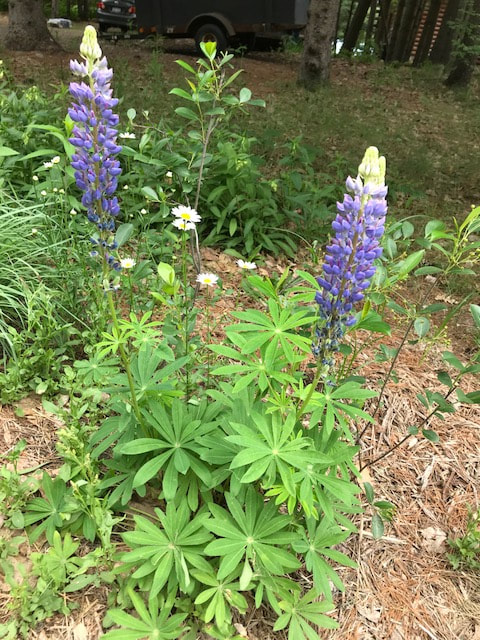
For more information, read past articles on this topic:
https://www.northcountrymgv.org/blog/seed-starting-indoors 
https://www.northcountrymgv.org/blog/more-on-starting-seeds-indoors  +  https://www.northcountrymgv.org/blog/still-more-on-starting-seeds-indoors  

Author:  Kimberly Kayler
1 Comment

Pollinator Gardens

3/14/2022

1 Comment

 
Asclepias tuberosa —Butterfly Weed, Rudbeckia hirta—Black-eyed Susan, Lupinus perennis —Wild Lupin,   
​If having a pollinator garden is something you’ve often thought about, maybe this is the year to give it a try! Not only do these gardens attract pollinators, such as butterflies and bees, they include flowers that provide nectar throughout the seasons. And, as the season ends, the reward is your own “living birdseed” feeders. So, how do you get started?
 
Although a pollinator garden can be any size – even as small as a balcony or a tiny yard, key to success is reviewing the preferences of pollinators. As a general rule, pollinators prefer gardens that:
  1. Include native plants; 
  2. Bloom from early spring into late fall providing nectar all garden season long; 
  3. Have plants that vary in flower shapes and sizes; and 
  4. Include different colors--bees tend to be attracted to purples, yellows and white; hummingbirds and butterflies to red flowers.
 
When designing the garden, analyze the property for things such as water drainage, soil types, sun light exposure and wind patterns. Pollinator gardens can create their own microclimate—areas with good southeastern exposure and spaces that are protected from prevailing winds. If your garden is going to be a border or up against a structure, arrange the tallest plants in the back, mid-size in the middle and short plants in the front of the bed.  If you are planting an island style, set your taller plants in the middle, medium heights around the center and shorter plants at the edges.
 
If not planting an informal, open field garden, consider plant placement.  It is often best to use groupings of at least three of the same plant together. Odd numbers (1, 3, 5, etc.) tend to look better than even numbers.  In addition, bee pollinators prefer to collect nectar/pollen from a single species of flower during each outing, so planting in masses ensures pollinators can practice “flower constancy.”  Consider designing and planting your garden so that over time it will consist of a grouping of 3 to 7 plants of the same species.  
 
Now that the garden space has been designed, loosen the soil and amend with organic matter.  Do not let your plants dry out! Water regularly until your bed becomes established. Other considerations for your Pollinator Garden include enhancing nesting opportunities for the pollinators and their families: preserve areas of bare or sparsely vegetated, well-drained soil; preserve dead or dying trees and shrubs; minimize mulch; consider nesting boxes; and maintain a nearby water source, such as a water garden or birdbath.
 
Curious about which plants have proven to be a good fit in northwest Wisconsin? Download this fact sheet for more information about Lupinus perennis—Wild Lupin,  Asclepias tuberosa —Butterfly Weed, Asclepias incarnata —Swamp Milkweed, Liatris spicata—Blazing Star Liatris, Rudbeckia hirta—Black-eyed Susan and Aster novae-angliae —New England Asters and more!  

Author:  Kimberly Kayler
1 Comment

Indoor Plant Pest & Disease Tips

3/7/2022

1 Comment

 
Picture
​General Tips:
  1. Buy clean plants—thoroughly look over plants before you bring them home,
  2. Place them in "quarantine" for a couple weeks before introducing them to your other plants,
  3. Decide your threshold of tolerance and patience; sometimes pest problems are more hassle than the plant is worth,
  4.  Scout your plants often!

Interested in something a little more challenging?  Try:  African Violet, Succulents and Cacti, Weeping Fig, Croton, Orchids
Crotons  need bright light to keep their colorful leaves.   

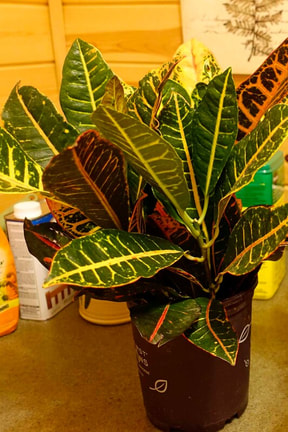
Scale & Mealy Bugs They come in various colors and can be armored, soft, or woolly. Piercing-sucking insects that create honeydew and make things sticky.  Populations quickly increase and control is difficult.
Control of scale and mealybugs: 1) Light infestations can be addressed with a Q tip dipped in rubbing alcohol, 2) Attempt to scrape off insects? 3) Use insecticidal soaps…or something stronger, 4) Remove infected plant tissues, 5) Submerge the entire plant in water? 6) Throw the plant away

Note about homemade insecticidal soaps: "New and improved" and concentrated liquid detergents with "grease cutters" and other ingredients have a high potential for being phytotoxic to plants. Proceed with caution. It’s better to go with a product that has been specifically developed and is labeled for your plants. 

APHIDS: Just like your garden aphids, but may have a waxy coating.   They create honeydew, like scale and mealybugs.  Scout and catch them early! Control of aphids: 1) Remove plant parts with the worst infestations, 2) Hose down plants or wash them off, 3) Use insecticidal soaps

SPIDER MITES: Related to spiders, Suck plant juices and cause yellowing and browning of plant tissues, If populations are high, you will also see webbing. Control of spider mites: Attempt to increase humidity in the home, Periodically wash down houseplants with a strong spray of water; including the lower leaf surfaces, Use miticides labeled for use on indoor plants
 
FUNGUS GNATS: Small flies that infest soil, potting mix, and organic matter, A nuisance pest Larvae primarily feed on fungi and organic matter, but also chew roots, Do not damage mature plants, Can have a generation every 17 days when temperatures are right.  Controlling fungus gnats: Target the larval stage, Reduce moisture and organic matter let media dry down between waterings, Use yellow sticky traps to catch adults? Repot using pasteurized potting mix, Will kill flies and the algae and microorganisms they feed on, Place chunks of potato on the plant surface to attract larvae, Consider using nematodes, predatory mites, or Bti (Mosquito Bits, Gnatrol)
 
WHITE FLIES: Tiny, white, moth like insects, Female adults lay eggs on the undersides of the plant’s foliage and the nymphs feed on the foliage, The nymph and adult stages feed by inserting their short, needle like beaks into foliage and sucking out plant sap. Heavy often cause stunting or yellow of leaves, leaf drop, and a decline in plant health.
Management: 1) Prevention is the best management strategy, 2) Check newly purchased plants and plants brought indoors from the garden or patio in the fall, 3) Begin control measures at the first signs.4) One way to reduce the whitefly population on an infested plant is to wash the undersides of the leaves with a moist cloth or sponge, 5) Use yellow sticky traps, 6) Insecticides specifically labeled for use on houseplants can be used, 7) Discard heavily infested plants
 
SCALE: Sucking insects both soft shelled and armored, Soft shell will produce honeydew, Heavy infestations may cause leaf yellowing, stunting, and dieback
Management: Scrape off, if possible, Wash off or crush any visible scale insects, Treat with an insecticidal soap or horticultural oil labeled for houseplants, Can use systemic houseplant insecticides, Heavily infested plants should be discarded
 
FOLIAR Disease:
Bacterial and fungal leaf spots: Decrease stress, Remove infected leaves and plant parts: Powdery mildew: Increase circulation around the plant; lower humidity, Remove infected leaves; Viruses: No cure; destroy plant
 
GENERAL DEFOLIATION: Likely causes: Sudden change in temperature, Transplanting shock, Sudden change in light intensity, Over watering, Lack of light

BROWNING LEAF TIPS: Likely Causes: Improper watering (such as water being too cold), Exposure to cold drafts, Insect attacks, Excess fertilizer, Floride or Boron deficiency (allowing water to sit for day before watering can help reduce floride.)

ABNORMAL LEAF COLOR: Likely Causes: Over watering, Lack of fertilizer, Insect attacks, Improper light
SPOTTED LEAVES: Likely Causes: Over watering, Burning from direct sunlight, Disease
 
REPOTTING: tips on when a plant might need repotting:
  1. Roots begin to grow through the drainage holes,
  2. Roots appear on the soil surface,
  3. Soil mass is filled with roots,
  4. New leaves are smaller than normal,
  5. The plant wilts between normal waterings,
  6. The plant keeps tipping over due to height

Repotting is best accomplished when the plant is actively growing, typically in spring or early summer which encourages new growth:  1) Gently knock/tip the plant out of its container and look at the roots, 2) If the plant is root bound, cut and/or unwind any circling roots, 3) If there is a salt buildup (crusty white residue) on the media surface, remove it carefully by scraping away the top inch of media, 4) Replant into the new container using fresh potting mix, 5) Make sure the plant is re potted at the same depth it was grown in the old pot, 6) Leave a little room at the top of the pot to allow for easy watering, 7) Press the soil around the roots and water immediately

PRUNING: All houseplants (with the exception of palms and Norfolk Island pine) can be top pruned to encourage new lateral growth. The best time to prune is in Spring, when growth usually occurs.
​
DUST CONTROL: Keep houseplants clean by carefully washing foliage. Washing leaves with water or cleaning with leaf polish is not recommended on plants with hairy leaves. Rinse plants off with room temperature water in a shower or sink. Use a soft, damp cloth to wipe foliage. Leaf polish products should be used sparingly and only on plants with firm foliage.

Master Gardener Vicki Gee Treft writes about what she learned from a "HOUSEPLANTS" course presented by Katie Dunker from the Colorado State University Extension.  ​
1 Comment


    Learn more about what's going on by checking out these local blogs and Facebook sites: 

    **Spooner Ag Station Facebook 
    ​* The River Flowing Blog
    ​
    *  GardenTrueNorth Blog

    (These blogs are not associated
    ​ with the UW-Extension except for the Spooner Ag Station Facebook page.)


    Archives

    August 2024
    March 2024
    February 2024
    January 2024
    September 2023
    August 2023
    June 2023
    May 2023
    April 2023
    February 2023
    October 2022
    September 2022
    August 2022
    July 2022
    June 2022
    May 2022
    April 2022
    March 2022
    February 2022
    September 2021
    August 2021
    July 2021
    June 2021
    May 2021
    April 2021
    March 2021
    February 2021
    January 2021
    November 2020
    September 2020
    August 2020
    July 2020
    June 2020
    May 2020
    April 2020
    March 2020
    February 2020
    January 2020
    December 2019
    November 2019
    September 2019
    August 2019
    July 2019
    June 2019
    May 2019
    April 2019
    March 2019
    February 2019
    January 2019
    December 2018
    November 2018
    October 2018
    September 2018
    August 2018
    July 2018
    June 2018
    May 2018
    April 2018
    March 2018

    Categories

    All
    All American Selections
    Annuals
    Bouquet Tips
    Event Announcement
    Fruits
    Growing Tips
    Invasive Plants
    Miscellaneous
    Perennials
    Pollinator Plants
    Projects
    Public Gardens
    Recipe
    Trees And Shrubs
    Vegetables

    RSS Feed

Location

Visit the Teaching & Display Gardens

The Teaching and Display Gardens  are a joint effort between the Spooner Agriculture Research Station, operated by the University of Wisconsin - Madison College of Agriculture and Life Science, the University of Wisconsin Cooperative Extension and area UW-Extension Master Gardener Volunteers.  

Open to the public for self-guided tours during day light hours seven days a week mid-May through mid-September. 

Contact Us

  • Home
  • Teaching Gardens
    • Twilight Garden Tour >
      • 2020 Virtual Twilight Garden Tour
  • Archives
    • Members >
      • Meetings
      • Committees
      • Member Handbook
      • Presentation Resources for Members
      • Volunteer Opportunities
      • Continuing Education
      • Onboarding
    • Press Releases
    • Plant Sale
    • Kids in the Garden
    • 2021 Handouts
    • 2020 Handouts
    • 2019 Event Handouts
    • 2018 Handouts
    • 2017 Handouts & Slides
    • 2016 Handouts & Slides
    • Archive Photos Pinwheels
  • About/Contacts
    • Speakers Available
  • Helpful Links
  • Training
  • Blog
    • Videos